Raspberry Pi: First Steps

Introduction
Raspberry Pi is a popular single board computer with 700MHz ARM11 microprocessor, Broadcom VideoCore IV GPU, 256 or 512 MB of RAM and uses SD card as its storage for operating system and user data/files. This single-board computer has a stereo audio output, easily accessible RCA Video and HDMI outputs, 10/100 Mb/s LAN connector and 1 or 2 USB ports. These peripheral makes Raspberry Pi interesting for all people who have knowledge of Linux operating system. Additional GPIO connector makes it interesting for electronics engineers as well. This single-board computer can be used in many applications - from home media center to the "brain" of a complicated robot.
From electronics engineering point of view, computing power and available LAN, USB, GPIO connectors of the Raspberry Pi are the main interests. For this reason, it is necessary to remove the need of extra keyboard and TV/monitor to operate and control this single-board computer. This article describes how to set up a Raspberry Pi so it would be possible to set up, use and hack it without external keyboard or screen. First we will discuss the necessary software, required steps to setup and boot Linux, as well as setting up a network connection. Raspberry Pi will be prepared for making further changes using SSH terminal client from a PC.
Necessary hardware
- Raspberry Pi
- SD card (2GB or more)
- Micro-USB power supply. The charger of a cell phone can be used instead.
- TV or monitor with either RCA or HDMI connector
- USB keyboard
- PC with MS Windows operating system
- Ethernet router or Ethernet switch
- Straight LAN cable;
- RCA video or HDMI cable;
Necessary software
- Linux image for Raspberry Pi. In this tutorial it is suggested to download Raspbian "wheezy" image.
- Win32DiskImager. This tool creates file system and writes necessary files from downloaded Linux image to a SD card.
- Putty. This tool allows accessing Raspberry Pi’s terminal using SSH.
Raspberry Pi requires software
Raspberry Pi is an excellent hardware of a computer, which like any other computer will not be useful without software. There are two ways to make it useful – installing operating system such as Linux or treating Raspberry Pi as a board with microcontroller that requires a low-level firmware. In most cases it is better to install an operating system. This will make application development faster. Operating system already has device drivers for LAN, USB, and other peripherals. In addition it usually also have basic software packages as well as possibility to install advanced software packages. Using operating systems there will be no need to spend time writing code for some of the parts your application needs, for example TCP/IP stack or web server. Possibly the most popular operating system used in single-board computers like Raspberry Pi is Linux. Linux is an open-source operating system that is used in many different devices, such as web servers, personal computers, mobile phones and even Ethernet routers.
Writing Linux image to SD card
Official Raspberry Pi web site provides the distribution of Linux system that is specially adapted for this single-board computer. You can download the image file for different versions of Linux distributions that differ one from other in functionality. Even though the provided Linux distributions consist of one file, beware that Linux is not a single file operating system. Simply copying this file to your SD card and trying to boot your Raspberry Pi will not give any positive results. Linux image file is more like an archive file on a personal computer. The only difference is that it does not only consist of Linux operating system files, but information about the file system to be written to the SD card. In order to boot Linux on your Raspberry Pi, you need to use specified software that can prepare the SD card and put necessary files to it according to the data in Linux image file. Such software is Win32DiskImager. Follow the steps below to correctly prepare your SD card.
1. Download and extract both Linux image and Win32DiskImager.
2. Insert a SD card to your computer and start Win32DiskImager.
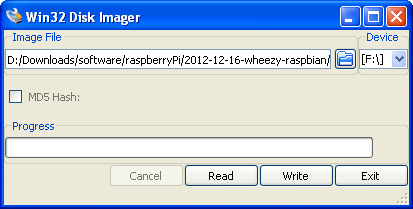
3. Click a blue folder button under "Image File" and locate the extracted Linux image (.IMG) file.
4. On the right, choose the disk drive for your SD card.
5. Click Write and confirm by clicking Yes in a pop-up dialog.
6. Be patient, writing of an image might take a couple of minutes.
7. Remove prepared SD card from your computer.
Booting and setting up Raspbian "wheezy" Linux distribution
1. Connect Raspberry Pi to your TV with either HDMI or RCA cable
2. Connect keyboard to either of the USB ports.
3. Insert SD cart to Raspberry Pi's SD card slot and plug in the micro-USB power supply.
4. Set your TV or monitor to show image from HDMI or RCA video input according to the connection you have made. You should see the Raspberry Pi configuration menu. To navigate in it use arrow keys on the keyboard.
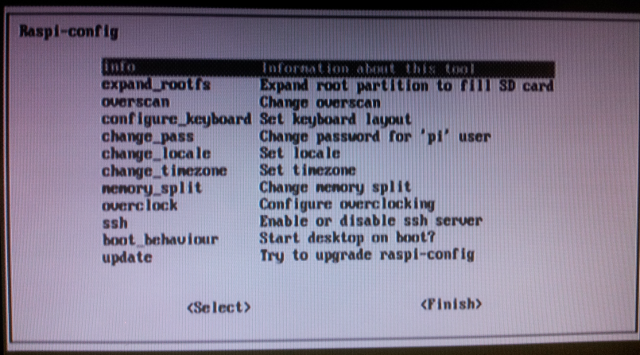
5. Select expand_rootfs to use all available space in your SD card for files, and programs.
6. Set your time zone and locale.
7. Enable SSH server.
8. If you want your Raspberry Pi to boot faster and you are not planning to use the Graphic User Interface often, choose not to start desktop on boot (boot_behaviour->No).
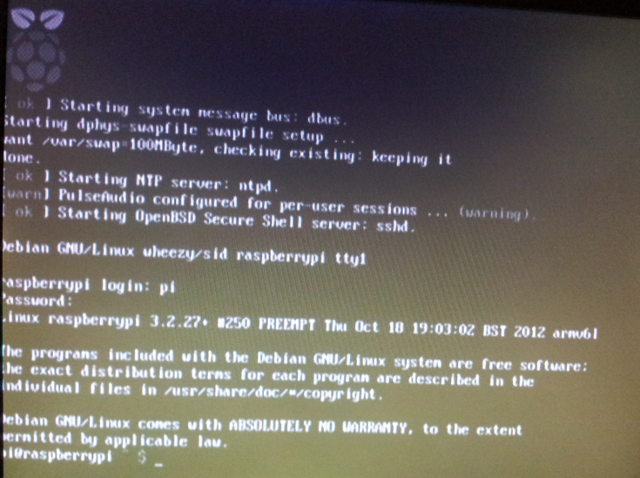
9. In main menu select Finish and choose Yes for reboot. After reboot you should see a Linux terminal with Raspberry Pi logo on the left. Proceeding to further steps, enter "pi" for user name and "raspberry”.
Configure Local Area Network on your Raspberry Pi
Changing further settings or installing new software on Raspberry Pi requires access to the terminal. All changes are made by typing commands to it and seeing responses on the screen. There are two possible ways to access the terminal – you can connect the screen and keyboard to your Raspberry Pi or you can connect to it via Local Area Network using SSH client. Aim of this article is to make Raspberry Pi accessible without keyboard and screen therefore we will make the configuration needed to access the terminal trough LAN.
Every device on a LAN has its own unique IP address. It can be either static (set by the user) or dynamic (determined automatically, getting data from the DHCP server). While static IP address is always constant, dynamic IP address might change every time you power up your Raspberry Pi. Accessing terminal trough LAN requires knowing the IP address of a device, thus dynamic IP address should not be used. By default, Raspberry Pi is configured to use dynamic IP address. This setting must be changed. Follow the steps above to setup a network connection and static IP address.
Determining IP address of Raspberry Pi and connecting to it with SSH client
1. Connect Ethernet router/switch to your Raspberry Pi using straight Ethernet cable. Your PC must be connected to the same router/switch.
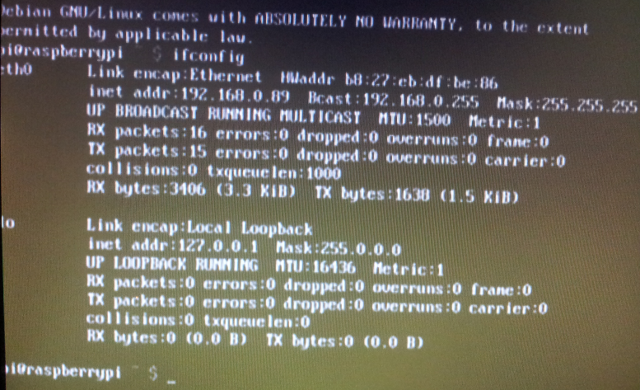
2. Using the keyboard in the terminal type “ifconfig” and press enter. You will be shown the Raspberry Pi's IP address. In the example above it is 192.168.0.89
3. Test if there is a connection between Raspberry Pi and your PC.
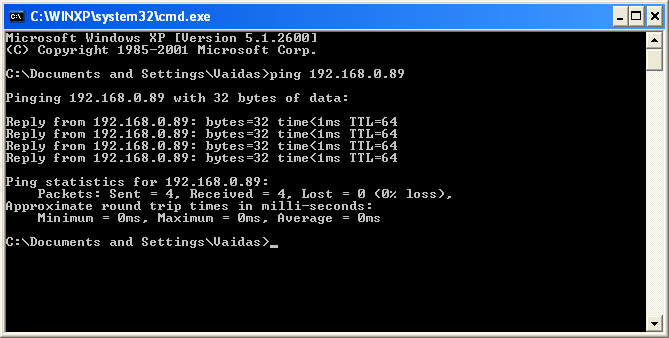
3.1. Open the command line tool provided by MS Windows (in Windows XP: click Start->Run, type "cmd" and click ok).
3.2. Enter command "ping <ip address of your Raspberry Pi device>" (in this example it is 192.168.0.89). This will send multiple messages to Raspberry Pi and show if it responds. If you see responses as in image above, the connection is ready. Now you can connect to the terminal from your PC.
4. Open Putty SSH client application on your PC.
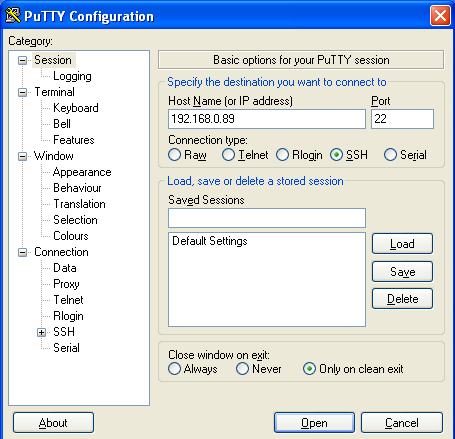
5. Enter your Raspberry's IP address and press Connect. A security dialog will open. Click Accept.
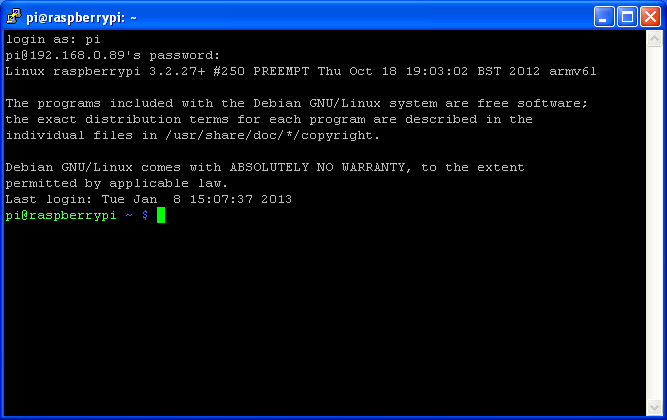
6. If you followed all the steps, you should see Raspberry Pi's login request. Enter the same login and password used before.
Setting static IP address
To set static IP address to your Raspberry Pi you need to modify network configuration file /etc/network/interfaces. There are several command-line text editors. One of such is vi. From the first sight it might look a little bit complicated, but you will get used to it quickly. You can get basic information about it here.
1. Open the network configuration file with vi text editor:
sudo vi /etc/network/interfaces
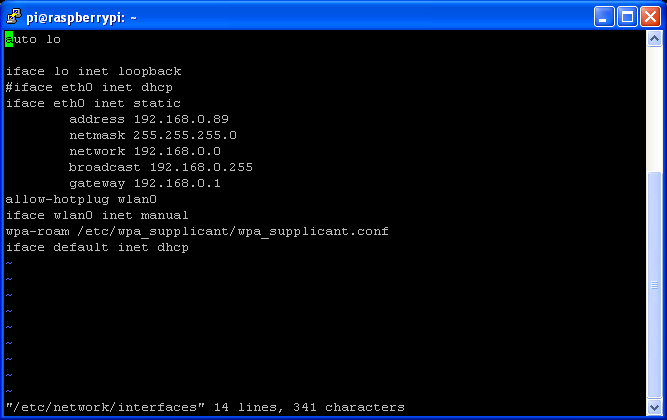
2. Comment line "iface eth0 inet dhcp" by writing "#"in front. In new line write "iface eth0 inet static"
3. Write the parameters according to your home LAN configuration
address <static address of Raspberry Pi>
netmask <network mask>
network <network address>
broadcast <broadcast IP address>
gateway <gateway IP address>
You can find more information about this configuration file here. The resulting file should look similar to the one in the picture below.
4. To save the file and quit the editor press esc and enter “:wq”
5. Reboot the Raspberry Pi by typing "reboot". Your Putty client should say that the connection is closed. On the screen connected to your Raspberry Pi you should see rebooting process.
6. Once you see login message on the screen, try to reconnect with Putty.Right click the title and choose Restart session.
7. In login prompt enter your username and password.
8. Configuration is done. Now you can unplug keyboard and TV from your Raspberry Pi.
Comments
Add new comment